How to Map Your Sales Process for 2023
Casey O'Connor
Sales process mapping is the act of evaluating and visually representing the steps your sales team takes in order to close a deal.
Creating your company’s sales process map can be fun, enlightening, and well worth the effort. This article will go over everything you need to know about how to effectively create your map, why it’s so important, mistakes to avoid, and more.
Here’s what we’ll cover:
- What Is a Sales Process Map?
- Why Your Business Needs a Sales Process Map
- Steps for Mapping Your Sales Process
- How to Create a Sales Process Flow Chart
- Sales Process Mapping Examples
- Common Sales Process Mapping Mistakes
- Tips for Mapping Your Sales Process
What Is a Sales Process Map?
A sales process map is exactly what it sounds like — a visual representation or “mapping out” of the current steps, decision points, and various outcome potentials that your sales team might face throughout the sales process.
The “map” can take many forms. A simple flow chart is a great place to start.

Some companies chunk their steps into tiers or groups of goals or checkpoints.

Some even opt for a more elaborate infographic.

Regardless of the visual aesthetic, the purpose of the sales process map is the same:
- Provide transparency to all team members involved in sales
- Systemize the sales process
- Create actionable, measurable progress steps that will allow your sales team to evaluate strengths and areas of growth within the sales process
Sales process mapping allows everyone to see the big picture, the mid-level steps, and the important details throughout the process, all in one place.
Sales Process Mapping vs. Sales Strategy
A quick note: don’t confuse the concept of sales process mapping with your sales strategy — we’re not talking about value-based selling vs. consultative selling vs. traditional selling.
Your sales process map should take your sales methodology into account, and it can be applied to any approach your team utilizes.
The map can even demonstrate how a variety of strategies or approaches can be used together to close deals. But the map itself is not the same thing as the sales approach; instead, the map should include any aspects of the approach that are relevant to each particular step.
Another note: Your sales process map is also not one in the same with your CRM.
Your CRM exists to provide automation and support your sales process, not the other way around. It’s true that many CRM software suites do a fantastic job of optimizing sales for a huge variety of companies, but no software will ever be able to perform at 100% effectiveness for your company’s unique needs.  Most CRM software, even the top-tier ones, have a certain “cookie-cutter” aspect, by design, until you really dig into their features as they relate to your company’s needs. None are one-size-fits-all. It’s up to you to leverage its capabilities alongside your sales process map to make the software as effective as possible.
Tip: How to create a strong CRM strategy here.
Why Your Business Needs a Sales Process Map
It’s no secret that salespeople today are facing more challenges than ever. Digital marketing strategies are advancing almost as quickly as we can adopt them. Customers are requiring less and less input from sales teams before making a buying decision. And our post-pandemic landscape is making connections harder than ever.
Adding another task to your plate can feel insulting at best, and impossible at worst.
But sales process mapping is anything but busy work. In fact, it’s a critically important and drastically underutilized step in maximizing your conversion rate.
Cohesion and Onboarding
Mapping your sales process allows all stakeholders to see the entire operation, top-down, start to finish. It also makes onboarding new salespeople that much more streamlined. The sales process map allows your team to:
- Work with one common blueprint: This gives your sales team a common goal and a sense of connectedness. It also reduces the chance that you’ll rely on only one or two extremely skilled sales reps to drive most of your business, while the rest deliver mediocre performance.
- Evaluate performance in a standardized way: Creating team-wide KPIs and building them into your sales process map will give you an objective set of metrics for measuring individual and team performance.
- Open the floor for valuable feedback: The sales process map is a great way to bring different perspectives and feedback to the table. Allowing everyone to have a voice in how the map is created — and, eventually, tweaked and changed over time as your goals change — will move your salesforce toward optimal efficiency.
Goal Setting
As mentioned above, sales process mapping can help you objectively evaluate the pieces of your sales process that are currently working well, as well as the parts that may need some fine-tuning.
The bigger picture here will allow you to effectively set specific, highly-targeted sales goals so that you’re constantly reaching for the next level of success.
This is another step that’s easy to write off as just another box to check. Most salespeople believe that they are already masterful at setting goals, but the data shows otherwise.
Goal-setting templates, such as the SMART goal framework, can help you target your performance and measure your progress.

Remember that goal setting can and should be done on both company-wide and individual levels.
Confidence & Efficiency
There are less-expected benefits to the sales mapping process, too. A great sales process map will highlight common customer objections, process pitfalls, and success hacks where appropriate. All of these will serve to increase the overall confidence of your sales team and allow you to build better relationships, faster with your potential customers.
Ultimately, your goal as a sales rep should be to find the most efficient, streamlined way of delivering the most value to the highest number of prospects.
Mapping your company’s sales process will allow you to see where, specifically, your process can improve to address pain points and meet the needs of more customers.
Steps for Mapping Your Sales Process
Many salespeople falsely assume that sales process mapping is a complex or challenging task.
While the process is admittedly a bit tedious — it does require some significant collaboration and attention to detail — it’s actually not terribly complicated.
And the benefits are well worth it; research shows that high-performing teams are more likely to adhere to formalized or guided sales processes.

Sales process mapping can help your team become more aligned, more productive, and more proactive in closing deals.
Here are the steps for mapping your sales process. Remember that this is a general guide; feel free to change or adapt it as needed to fit the needs of your team.
1. Define Your Starting Point
Most sales teams choose to start their sales process map at the top of the funnel, but your team may decide to start elsewhere. Some teams, for example, prefer to start their sales process map at the moment of the first sales interaction.
Either option is okay. There isn’t a right or wrong place to start — just make sure that everyone involved in the process is clear about where it will begin.
2. Align Your Teams
In order to create an effective and accurate sales map, sales, marketing, and sometimes customer success teams need to collaborate closely. The specifics of your sales process map will depend heavily on the unique characteristics of your ideal customer profile (ICP) and buyer personas.
 While it can be challenging to collaborate among so many different stakeholders, the results are well worth it. Research shows that organizations in which marketing and sales are well-aligned have a 36% higher customer retention rate, among many other significant benefits.
 During this step, it’s also worth it for sales managers to spend time outlining the benefits of sales process mapping to all parties involved. The tediousness of the work can feel easier if the ones putting in the effort trust that the payoff will be worth it.
3. Map Your Current Process
You won’t be able to map your sales process without knowing exactly what takes place “in the field,” so to speak.
Spend time talking to all the various people involved in your sales process as it currently stands. Be sure to include marketing and customer success, as well. This will ensure you get insight into the process from all angles.
Mapping your process as it stands now will allow you to create the most accurate sales process map possible. It will also highlight where the strengths and weaknesses currently exist so that you can capitalize on them and improve them, respectively.
4. Name Your Stages
Once you’ve outlined your current sales process, it’s time to break it down into identifiable stages. All stages need to have a specific name.
It’s important to note that there’s no right or wrong way to name your sales stages. The names should be unambiguous and distinct from one another, but don’t get too hung up on the semantics.
Choose clear, easy-to-remember titles that can be easily adopted by everyone on your team.
Some examples of names for various sales process stages might include:
- Brand awareness
- Marketing qualified lead (MQL)
- Sales qualified lead (SQL)
- Sales interaction
- Sales conversation
- Discovery call
- Needs analysis
- Sales qualification
- Sales demo
- Sales presentation
- Proposal
- Quote
- Verbal agreement
- Contract signed
- Implementation
- Onboarding
- New client
- Existing client
5. Define Each Stage
Once each stage has a name, it’s time to clearly define them.
Each stage of your sales process needs to be defined by four key pieces of criteria:
- The name of the stage
- The criteria that allows a deal to be classified in that stage
- The specific actions and decision points that occur during that stage
- A clear, actionable list of what needs to be completed before a deal can be classified into the next stage
Again, the specifics of each of these components will be unique to your organization and the needs of your buyer. The important part is that everyone involved in the process is explicitly trained in how the deal moves through the various stages.
6. Visualize the Flow
Once the stages are defined, it’s time to draw your sales process map.
Don’t overcomplicate the visual aspect of your sales process map. In fact, the simpler the better.
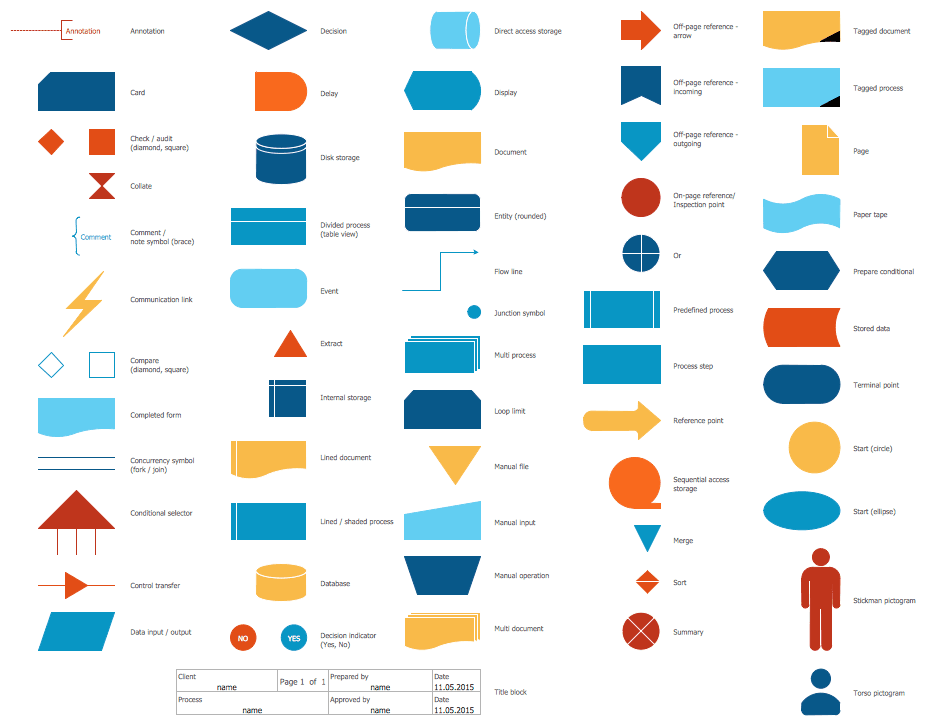
You could, for example, use squares for decisions, diamonds for starting/stopping points, and arrows designating movement through stages. Leave room for small rectangular boxes on the sidelines for notes. It doesn’t need to be any more complicated than that.
There’s no need to reinvent the wheel for this step. There are many sales process mapping software platforms, but you can also use a variety of free or otherwise easily-accessible tools like Lucidcharts or Powerpoint that can help you draw out the process.
7. Track, Measure, and Manage It
Once your sales process is completely mapped, the last step of the process is to create a governing structure around who will track and manage it, and how. It’s important to create and maintain accountability around how the sales process map gets managed and measured.
First, decide on what metrics you’re going to track. Common sales KPIs include:  Then, assign roles and responsibilities around what to track (and when, and where) for anyone adjacent to those metrics. This data will help you improve and optimize your sales process over time.
Sales reps should also take personal responsibility for recording their own progress and thoughts around the sales process map.
Tip: When mapping your sales process, do you have the right tools in place? Check out our free blueprint below for guidance.
 The Optimal Technology Stack for B2B Sales TeamsUsing data from the most successful business-scaling models, we designed a blueprint for the exact technology your business needs at each phase of growth.
How to Create a Sales Process Flow Chart
By definition, no two sales process maps should look the same. That’s because each one is unique and should be custom-created based on the following:
- Specific information and feedback from every member of the sales team
- Your company’s unique approach to sales (make sure to address any key methodologies you want your sales reps to utilize)
- The company’s current level of operation, its future goals, and the KPIs you use to measure your progress
Unfortunately, that means that an “A – Z blueprint” on exactly how to create your sales process map doesn’t exist.
That being said, there can be a “method to the madness” when you go about creating your own.
1. Reverse Engineer
The sales process is rarely linear. Every step in the sales cycle has multiple pathways or potential outcomes; you would be doing your salesforce a disservice to expect them all to perform the exact same sales activities in the exact same way.
Each potential customer will require a variety of strategies — and encounter a variety of outcomes — to close the deal; your map should aim to encapsulate as many of these pathways as possible.
That’s why we recommend reverse-engineering the sales process while creating your map. Start by envisioning where you ultimately want to end up — this may mean revenue goals, customer retention rate, or simply the number of closed deals — and work backward from there. Go through all the steps, and their outcome branches, until you reach the beginning stage.
This will help ensure you don’t skip any steps in the sales cycle and explore each one to its fullest extent.
2. Consider the Customer’s Perspective
The most elite sales teams know that effective selling is always framed around the customer; the sales process map should be no different.
When you’re creating your map, be sure to keep the buyer’s journey at the forefront of your mind. This is another tactic that will ensure your map is thorough and, more importantly, designed around your customer’s needs.
3. Get Into the Nitty Gritty
Building an effective sales process map means getting feedback from each member of the sales organization — even the ones that may seem peripheral. If customer service is on the backend of the close, they should be included in the sales process map.
If you have a front-end team whose sole responsibility is prospecting LinkedIn for leads and then handing them off to the actual sales reps — put them on the map, too. Anyone who plays a role in the sales cycle should have a seat at the table.
Further, make sure each person’s role in the process map is clearly defined. That way, when you do have employee turnover, your onboards will quickly and clearly understand their specific role in the process at your company.
You may also want to consider including common mistakes, customer pain points, choke points, “success hacks” — we’ve even seen a sales map with a follow-up script! Remember, this is a process map, not a cheat sheet. But making note of current snags in the process will allow your salesforce to collectively problem-solve and push through any hang-ups.
4. Be Honest
Map the process that’s currently happening — don’t try to paper over something you know isn’t working just for the sake of having a map that’s “right” or “ideal.”
The sales process map is a living, breathing document and can — and should be! — updated over time. That doesn’t mean you need a new process every time; instead, refine and tweak your map as needed, or as you reach new and more challenging goals.
5. Be Purposeful
There’s a lot that goes into the sales process map. Finding the right information to include (and knowing when to exclude the fluff) can be challenging. But don’t let the details outweigh one of the most important aspects of the map: the visual.
The sales process map should look inviting and logical. Of course, don’t get hung up on things like font or image selection, but do invest time into thinking about the flow of your process and how to best demonstrate it graphically.
For some, a flow chart can be too overwhelming if there are a ton of steps. It can also create a false illusion that the process is linear, which it typically isn’t. There will be a delicate balance between including all relevant information versus overwhelming your team with too many details.
One way some sales departments approach this is by grouping certain steps together into categories.
 Other teams use shapes and colors to designate information versus decision-making, as well as levels of importance. There are easily accessible guides to help you with this process if it makes sense for your particular sales funnel.
(Note here that there are near-limitless combinations of colors and shapes — don’t go overboard. Keep it simple and easy to read — diamonds for decisions, red for roadblocks, etc.)

Again, the ultimate design of the map should amount to a collaborative effort and should be unique to your company. Software can help with this process if need be.
Sales Process Mapping Examples
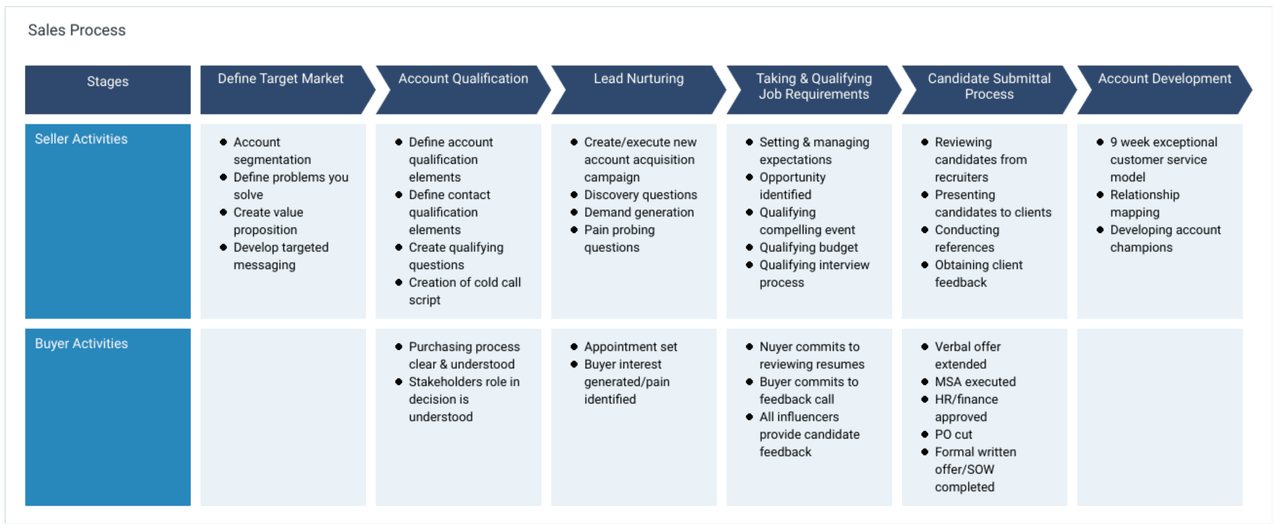
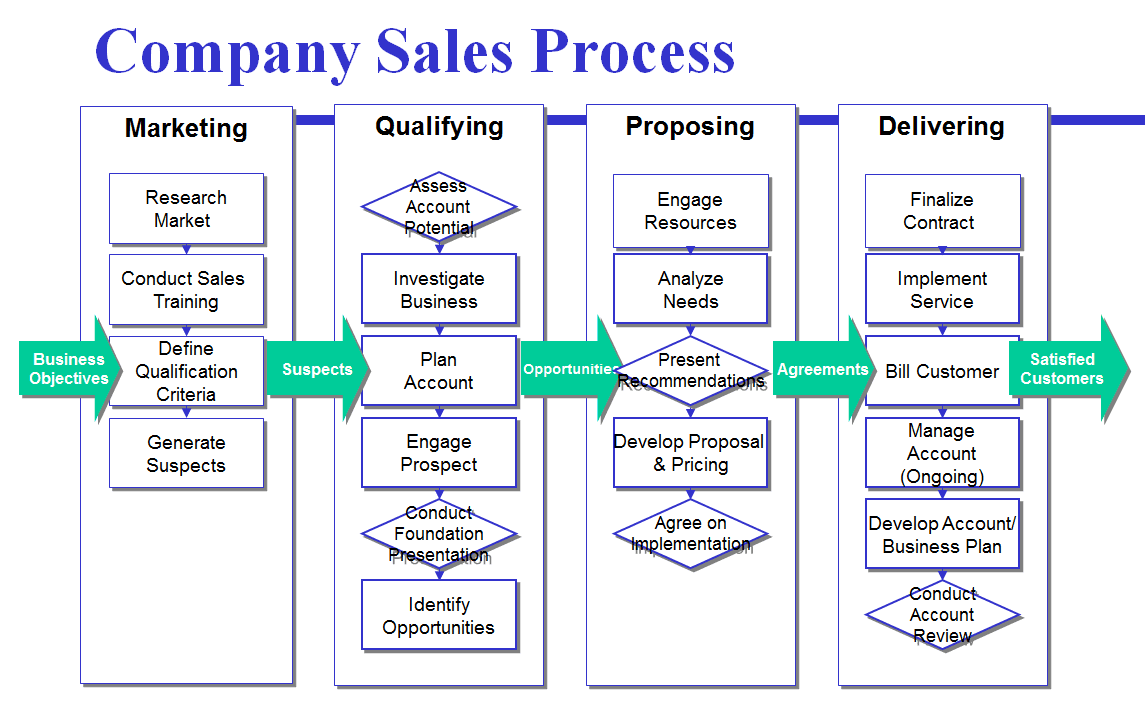
Here are a few more examples of interesting sales process maps from across the web.
The following flow chart map starts by showing a multi-branch lead generation strategy. It uses basic graphics to illustrate the selling process and customer journey.
 This next one does a great job of showing when and how to effectively use CRM to leverage the process.

Finally, this last one does a great job showing the different stakeholders, and assigning colors for specific events.

Each of these examples were designed by the salespeople involved in the process, and with the specific company in mind — just like yours will be. We can’t wait to see it!
Common Sales Process Mapping Mistakes
Mapping the sales process has benefits for just about any team. The key is to ensure the mapping process runs smoothly.
Some sales teams fail to avoid common pitfalls throughout the process, and mapping becomes a frustration rather than a valuable tool. Avoid these common sales process mapping mistakes to make sure you maximize its benefits.
The Map Is Too Vague
Some sales teams create sales process maps that are too ambiguous to be actionable or insightful.
Everyone involved in the sales process should be able to look at the sales process map and know exactly where they are in the process, and what to do next. Each stage and decision point needs to be specific and clearly explained in writing.
The Map Is Too Detailed
Some sales teams, though, run into the opposite problem — they create a sales process map that’s too complex or overly detailed.
Sales process maps should have enough detail to be clear, but no more than that. It should explain potential action steps for one or two of the most common outcomes, but doesn’t need to explain every possible outcome scenario for each stage. Keep the big picture and your goals in mind, and don’t get lost in the weeds.
Failing to Put the Customer First
Although your sales process map is created based on the internal actions of your team, it needs to also be created with the buyer in mind.
The customer’s needs and expectations should guide every decision and action your salespeople make throughout the process. Each stage should provide clear value to the customer according to their unique buyer’s journey.
The Steps Are Not Actionable
Think of your sales process map as an instruction manual. It should tell sales reps exactly what to do in each step and stage of the process.
Avoid making a sales map that’s descriptive or analysis-heavy; instead, create steps and stages that are actionable and give sales reps clear-cut guidance on how to proceed.
Trying to Fit Your Process Into a Prescribed Template
Sales process maps are meant to be unique and should be an accurate representation of what’s happening in real-world sales scenarios that your team encounters every day.
It’s counterproductive to try to create a map that’s not representative of what your sales process actually looks like in favor of making it fit a certain standard or alternative desired state.
Tips for Mapping Your Sales Process
Keep the following tips in mind as you create your sales process map.
- Use the buyer’s journey as your north star. As mentioned above, the buyer’s journey and the customer’s needs should be at the forefront of your mind when creating your sales process map.
- Include everyone involved in the sales process. It’s imperative that you solicit feedback from everyone involved in or even adjacent to the sales process when you create your sales process map.
- Use technology to your advantage. There are plenty of software tools, both free and fee-based, that can help sales teams create an accurate and aesthetically-pleasing sales process map.
Get sales tips and strategies delivered straight to your inbox.
Yesware will help you generate more sales right from your inbox. Try our Outlook add-on or Gmail Chrome extension for free, forever!
Related Articles
Casey O'Connor
Casey O'Connor
Casey O'Connor
Sales, deal management, and communication tips for your inbox

